
The Ronnie Rig (Spinner Rig): A Reliable Pop-Up Setup for Michigan Carp
If you want a pop-up rig that’s easy to reset, hard for carp to deal with, and consistent on clean bottoms, the Ronnie Rig (often called the Spinner Rig) is a proper tool to have. The whole point is simple: the hook can spin and catch hold fast, while the stiff-ish boom helps the rig kick away from the lead and settle neatly.
On pressured waters — clear gravel bars, firm sand, light debris, or the edges of weed — this rig is a “set it right and trust it” option.
Caption idea: “Ronnie rig with a critically balanced pop-up — tidy boom, exposed point, and a compact bait.”
The Ronnie Rig, also known as the Spinner Rig, has become one of the most trusted and widely used presentations in modern carp fishing. Developed in the UK during the early 2010s, it is widely credited to British angler Ronnie Brent, from whom it takes its name, though its popularity exploded after being refined and championed by top European carpers on the competitive circuit. The rig’s genius lies in its rotating, spinner-style setup — a short, curved shank hook mounted on a swivel that allows the hookbait to move freely and naturally in the water, dramatically improving hook-hold percentages. Originally designed for fishing over clean, hard lake beds with pop-up boilies, it quickly gained a reputation for its aggressive hooking mechanics and self-hooking properties. From the banks of English reservoirs and French gravel pits, the Ronnie Rig crossed the Atlantic and found its way into the tackle bags of North American specimen hunters — and nowhere has it proven more effective than in the rich, productive waters of Michigan, where some of the finest carp fishing on the continent awaits.
Quick Start
Best use: Pop-ups and critically balanced hookbaits
Hook sizes: 4–8 (size 6 is the safe default)
Boom length: 5–8 inches (shorter for bags/close work; longer for general casting)
Bottom types: Gravel, firm sand, light silt, clean spots in weed
Hooklink: Stiff fluorocarbon or stiff coated braid as the boom
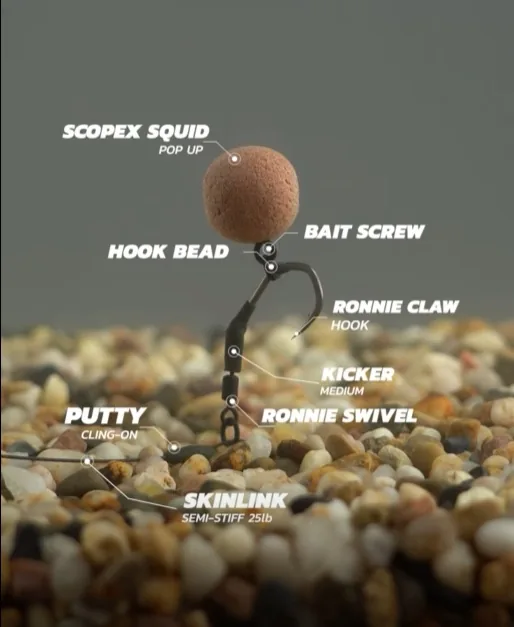
What You Need
- Spinner/quick-change hook swivel (or “spinner” component)
- Strong wide gape / curve-style hook (in-turned eye helps)
- Fluorocarbon or stiff coated braid for the boom
- Hook bead or small sleeve to lock the hook on the swivel
- Bait screw or rig ring + floss (for the pop-up)
- Anti-tangle sleeve (optional but useful)
- Putty (to pin/balance the bait)
What the Ronnie Rig Actually Does
The hook isn’t fixed in one position — it can rotate on a swivel. That extra movement helps the hook flip and grab hold quickly when a carp sucks and blows. The boom section helps with three things: it kicks the rig away from the lead, reduces tangles, and helps the hookbait settle where you want it instead of folding back on the cast.
Done neatly, it’s a clean hooking setup. Done messy, it’s a tangle machine. Keep it tidy and it behaves.
Do This / Avoid This
Do This
- Use a sharp hook and change it often (Ronnie rigs only work as well as the point)
- Keep the boom neat and reasonably stiff so it kicks away
- Balance the pop-up so it’s not “towing” the hook around
- Test it in the margins: pull the hooklink and watch the hook flip and catch
- Fish it with a safe lead system that can release under pressure
Avoid This
- Huge high-buoyancy pop-ups that need loads of putty (awkward and unstable)
- A boom that’s too long (more tangles, less control)
- Letting the hook sit wonky on the swivel (it should sit straight and spin freely)
- Dull hooks “because it looks okay”
- Any setup that can’t dump the lead if it needs to
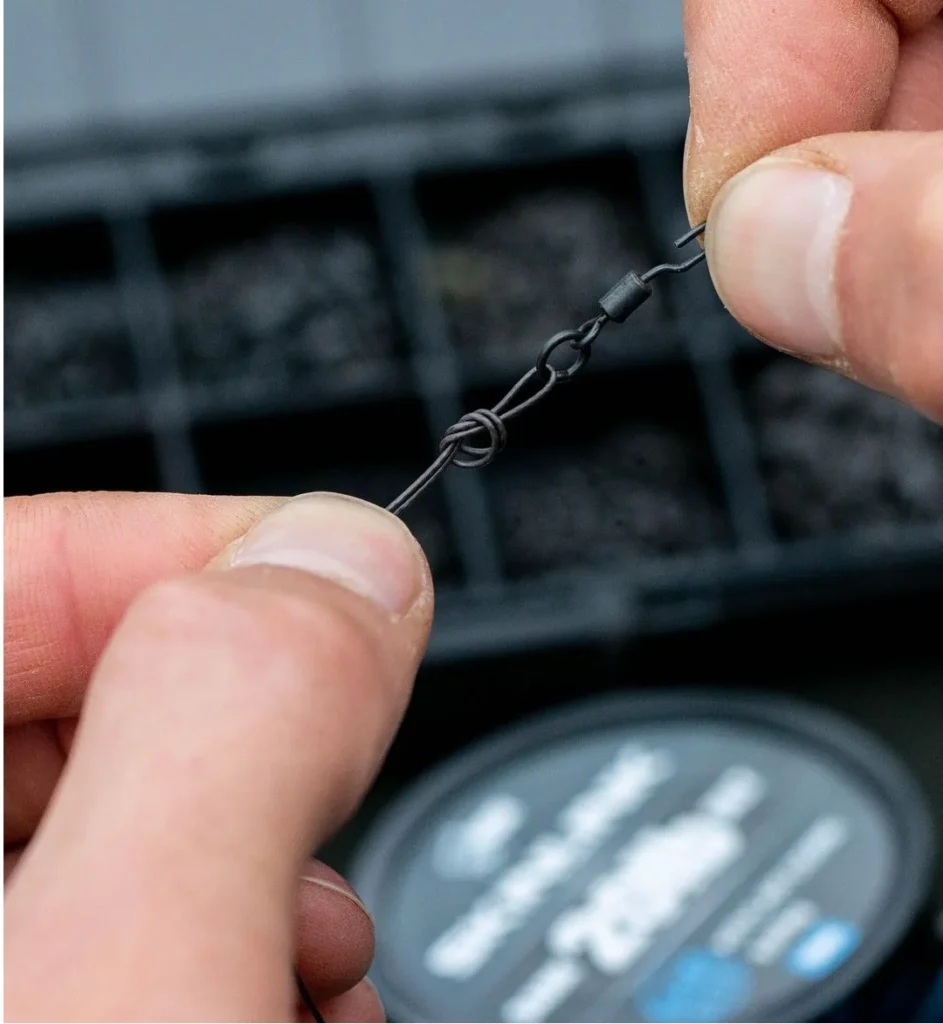
Close-up of the Ronnie swivel connection — keep the knot compact so the swivel stays free to work.
Step-by-Step: How to Tie the Ronnie Rig
Step 1: Build the Boom Section
Cut 8–10 inches of fluorocarbon (or stiff coated braid) and tie one end to your swivel/quick-change. A figure-of-eight loop works if you like loop-to-loop; tying direct is fine too. Keep it tidy. This section does the anti-tangle work.
Boom section in hand]

Step 2: Mount the Hook on the Spinner Swivel
Slide the hook onto the spinner swivel. Lock it in place with a hook bead/sleeve so the hook can’t come off, but still rotates freely. If the hook can’t spin cleanly, you’ve lost the main benefit of the rig.
Step 3: Add a Kicker or Shrink Tube (Optional, but Often Helpful)
If your hook pattern already turns aggressively, you may not need extra plastic. If it turns “lazy” in tests, add a short kicker or a small piece of shrink tube to help the hook flip. Keep it minimal — this isn’t a plumbing job.
Step 4: Connect Hook Section to Boom
Attach the spinner swivel to the boom (usually via a loop or quick-change connection). Add an anti-tangle sleeve if you’re casting a long way or you’re getting occasional wraps.
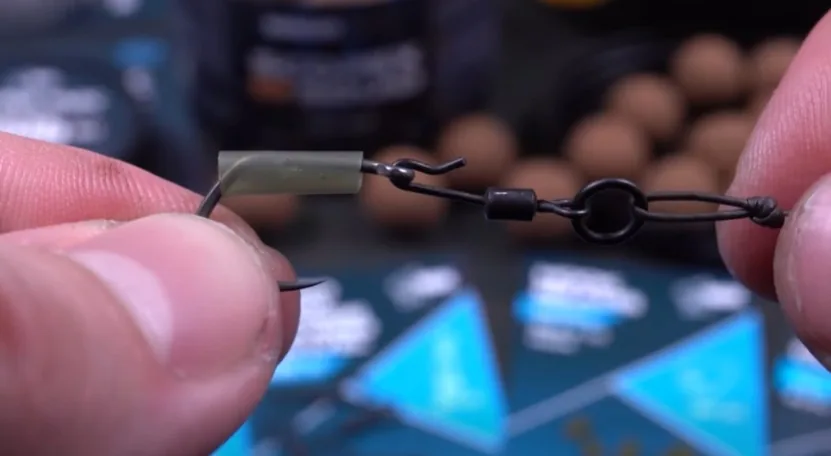
Image © Nash Tackle — used with permission (nashtackle.co.uk).
Step 5: Baiting (Pop-Up / Critically Balanced)
Mount the pop-up on a bait screw or floss on a rig ring. For most situations, a 12–15 mm pop-up is plenty. If the bait is so buoyant it drags the hook around, trim it or use a lighter pop-up. Add a tiny pinch of putty on the boom (near the hook end) to get it sitting how you want.
[IMAGE PLACEHOLDER 5 — Finished rig with hookbait]
Caption idea: “A compact pop-up and a balanced rig: the bait settles gently and the point stays clear.”
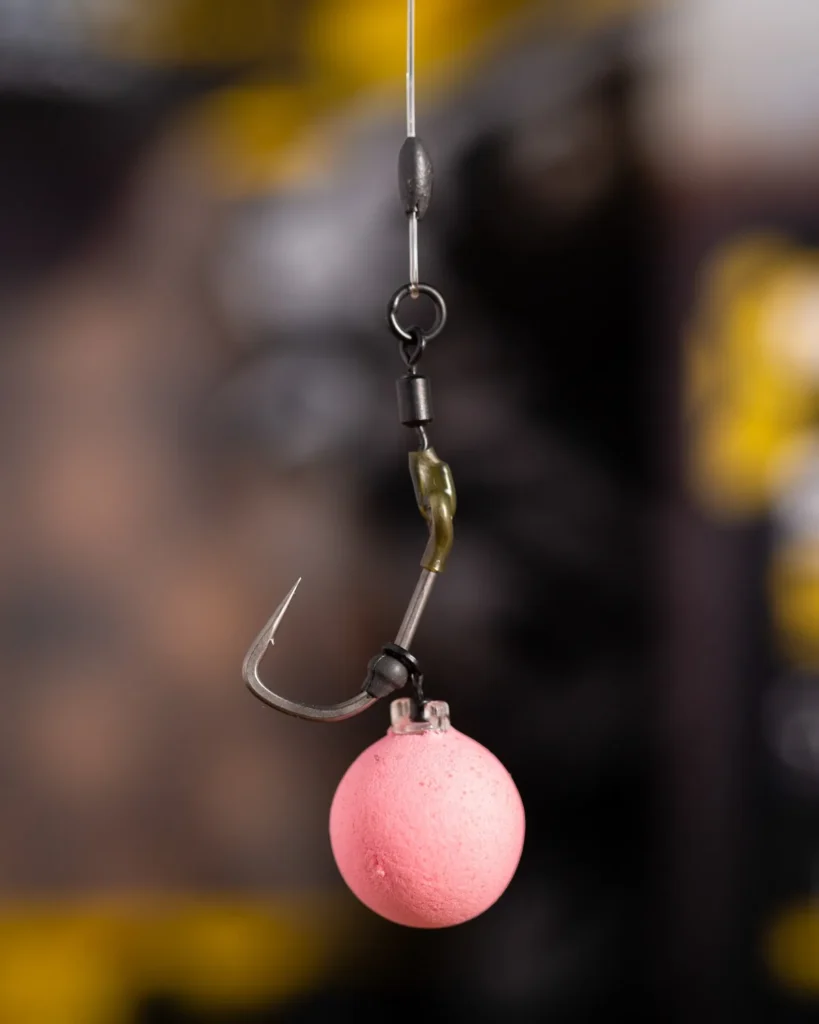
Image © Nash Tackle — used with permission (nashtackle.co.uk).
Step 6: Quick Margin Test
Drop it in the edge. The boom should kick away and settle straight. Pull the hooklink slowly: the hook should flip and catch without the bait masking the point. If it doesn’t, fix it now — don’t “hope.”
Hook, Boom Material, and Lengths That Actually Work
Hooks
- Size 6: the safe default (most conditions)
- Size 4: bigger baits, harder fighting fish, snaggy areas (only if you can control the fight)
- Size 8: smaller hookbaits on very clear, pressured water
Boom Material
Fluorocarbon is the classic choice because it’s stiff, sinks nicely, and behaves in flight. Stiff coated braid can work too, especially if you want a little more forgiveness over light debris. Either way: keep it neat and not too long.
Lengths
- 5–6 inches: short, tidy, quick bites (bags, close work)
- 6–8 inches: the “do most things” range
- 8–9 inches: only if you need extra separation (and it still casts clean)
Common Mistakes
- Over-buoyant bait: it drags the hook and ruins the mechanics
- Boom too long: increases tangles and looks messy
- Hook isn’t spinning freely: defeats the point of the rig
- Point masked by putty or bait: you’ll get taps and liners but poor hook holds
- Not re-checking after a cast: one wrap and you’re fishing a mess
Troubleshooting
If It Tangles
- Shorten the boom slightly
- Add an anti-tangle sleeve
- Use a slightly stiffer boom material
If You’re Getting Liners But No Takes
- Downsize the hookbait (or trim it)
- Change the hook (sharpness first)
- Make the rig sit lower: a touch more putty, smaller pop-up, or critically balanced bait
Michigan Notes
Clear water is where it earns its keep. A tidy Ronnie rig on a clean patch can outscore “softer” rigs when fish are cautious and have seen basic hair rigs all season.
Gravel transitions are prime. If you can find firm bottom next to weed, this is a good pop-up choice — it presents clean and helps avoid the bait settling into light debris.
Check for abrasion. If you’re fishing areas with mussels, rock, or rough gravel, inspect the boom after every fish. Small damage becomes big problems fast.
What I Do
If I’m fishing a pop-up on clean ground, I keep it simple: size 6 hook, 6–8 inch boom, compact bait, and just enough putty to make it settle naturally. I test it in the edge before every cast. If it doesn’t flip and catch clean, I retie it.
FAQ
Is the Ronnie Rig the same as the Spinner Rig?
Pretty much, yes. Most anglers use the names interchangeably. The key feature is the hook mounted on a swivel so it can rotate freely.
Can I fish it with a wafter or bottom bait?
It’s mainly a pop-up/critically balanced rig. You can make it work with other baits, but there are better rigs for straight bottom baits.
Do I need a kicker or shrink tube?
Not always. If your hook turns well in tests, keep it clean. Add a small kicker only if the rig looks “lazy” and isn’t flipping reliably.
How do I balance the pop-up correctly?
Use the smallest pop-up that suits the hook, then add a tiny pinch of putty on the boom near the hook end. You want it to settle gently, not hover like a balloon.
What’s the biggest mistake with this rig?
Overcomplicating it. Long booms, huge pop-ups, too much putty, and messy components cause tangles and poor hook holds. Keep it neat.
Next Steps
If you want to build a full rig toolkit (and keep everything snag-safe), these are worth a read next:
- Carp Rigs Guide – Pick the right rig for the job
- Lead Systems for Carp – Keep it safe and effective
- Playing Carp Near Weed & Snags – Landing fish without drama